Sous Vide Turkey Breast with Crispy Skin
J. Kenji López-Alt is the Managing Culinary Director of Serious Eats, author of the James Beard Award-nominated column The Food Lab, and a columnist for Cooking Light. He lives in San Francisco. A New York native, Kenji cut his cooking chops the old-fashioned way by wo ...
Sous-vide is a fantastic method for cooking holiday roasts. It delivers reliable moist and tender results, frees up your oven for other tasks, requires almost no supervision while cooking, and is very easy to hold hot and ready to serve until your guests are ready. That said, sous vide turkey comes with a few problems. We've solved the issues to give you a recipe that produces turkey cooked exactly how you like it, with deep roasty flavors and extra-crispy skin to boot.
Why this recipe works:
- Tying two breast halves into a cylinder makes for perfectly even cooking and gorgeous presentation.
- Sous-vide cooking offers a very high level of precise control over the end results.
- Cooking the skin separately in the oven delivers the roasty flavors and extra crispness that we love about great roast turkey.
- Using the breastbone to fortify stock gives rich, flavorful gravy
Shop Anova
Anova
Pro-level cooking techniques made simple.
Ingredients for 6
1 Large Whole Skin-on, Bone-in Turkey Breast (about 5 lb / 454 g)
Kosher Salt and Freshly Ground Black Pepper
-- For the Gravy (optional) --
1 tbsp / 15 ml Vegetable Oil (for gravy)
1 Large Onion, Roughly Chopped (for gravy)
1 Large Carrot, Peeled and Roughly Chopped (for gravy)
2 Stalks Celery, Roughly Chopped (for gravy)
1.5 q / 1.5 L Low Sodium Chicken Stock (for gravy)
2 Bay Leaves (for gravy)
1 tsp / 5 ml Soy Sauce (for gravy)
3 tbsp / 45 g Butter (for gravy)
1/4 c / 30 g Flour (for gravy)
Directions
-
Step 1
Adjust the Precision Cooker to your desired target temperature (take a look at the time and temp guide for some good bets), and start preheating the water. I personally like my turkey cooked at 145°F / 62.8ºC for 2.5 hours.
-
Step 2
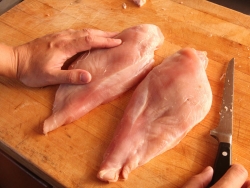
Starting with a whole turkey breast, remove the skin in one large piece. Use a sharp boning knife to remove the breast halves from the breast bone. (Optional: for gravy, save the breast bone.)
-
Step 3
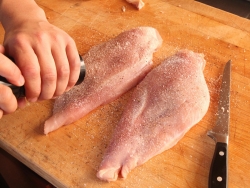
Season the breast halves generously with salt and pepper.
-
Step 4
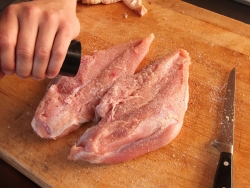
Season the bottoms of the breast halves as well.
-
Step 5
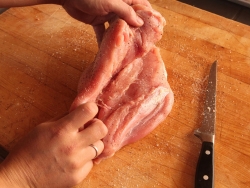
Align the two breast halves so that they are matched up like a jigsaw, with the fat end of one lined up with the skinny end of the other.
-
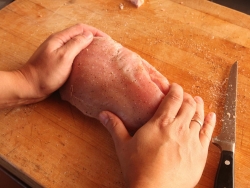
Step 6
Gently press the turkey into an even cylindrical shape.
-
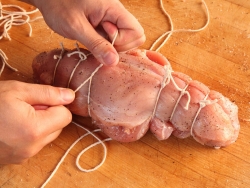
Step 7
Tie the breasts at 1-inch intervals using short lengths of kitchen twine. Start by tying both of the ends, then work your way to the center, alternating ties on each side.
-
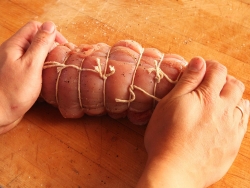
Step 8
Adjust the shape of the turkey again to form a neat cylinder.
-
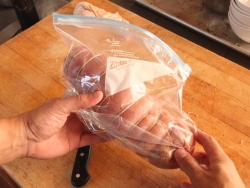
Step 9
You can use a vacuum sealer, but a heavy duty zipper-lock bag will work just as well. Place the turkey inside the bag. At this stage, the turkey can be refrigerated for up to 3 days to dry-brine.
-
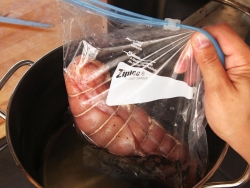
Step 10
Slowly lower the bag into a pot of water, letting the pressure of the water press air out through the top of the bag.
-
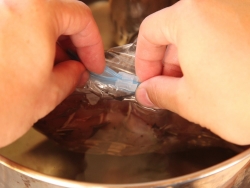
Step 11
Once most of the air is out of the bag, carefully seal the bag just above the waterline.
-
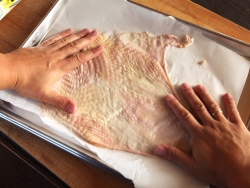
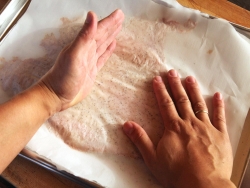
Step 12
While the turkey cooks, start working on the skin. Adjust the oven temperature to 400°F / 204.5C, then spread your turkey skin out in a single layer on a parchment-lined, rimmed baking sheet.
-
Step 13
Season the skin generously with salt and pepper.
-
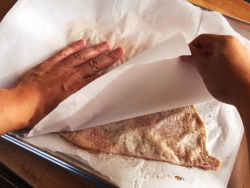
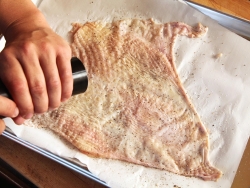
Step 14
Cover the skin with a second sheet of parchment.
-
Step 15
Carefully squeeze out any air bubbles.
-
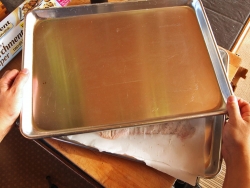
Step 16
Place a second rimmed baking sheet on top of the first to keep the skin flat as it cooks.
-
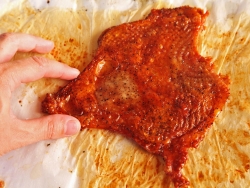
Step 17
Roast the skin in the oven until it is extremely crisp. This takes about half an hour to 45 minutes. The cooked skin can be left to cool at room temperature and stored in an open container for up to a day. Re-crisp it in the toaster oven before serving if it turns soft (though it probably won't).
-
Step 18
For the Gravy: Chop breastbone into 1-inch chunks with cleaver. Heat oil in medium saucepan over high heat until smoking. Add turkey neck, onions, carrots, and celery, and cook, stirring occasionally, until well-browned, about 10 minutes total. Add stock, bay leaves, and soy sauce. Bring to a boil then reduce to a simmer. Simmer for 1 hour then strain through a fine mesh strainer. You should have a little over a quart of fortified stock. If not, add water or more chicken stock to equal 1 quart. Discard solids and set stock aside.
-
Step 19
Melt butter in medium saucepan over medium heat. Add flour and cook, stirring constantly until golden brown, about 3 minutes. Whisking constantly, add broth in thin, steady stream. Bring to a boil, reduce to a simmer, and cook until thickened and reduced to about 3 cups / 700 ml. Season to taste with salt and pepper. Keep warm.
-
Finishing Steps
-
Step 0
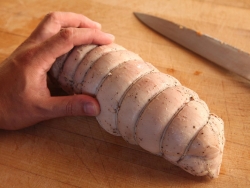
When the turkey is cooked, remove it from the bag and carefully untie all of the strings. The cooked turkey can also be chilled in an ice bath and stored in the refrigerator for up to a week. Reheat it in a 130°F / 54.4ºC water bath for about an hour before serving.
-
Step 1
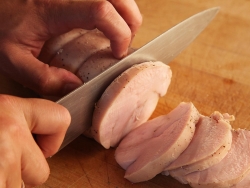
Slice the turkey using a very sharp chef's knife and smooth, even strokes.
-
Step 2
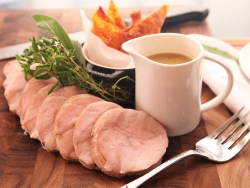
Arrange the slices in a fanned out array on a cutting board or warmed serving platter and place the skin, broken into individual portion-sized pieces, into a serving vessel. Add a little pitcher of basic gravy made with chicken stock that you've fortified by simmering with the turkey breastbone. See steps 18 and 19 in the directions for gravy.
-
Step 3
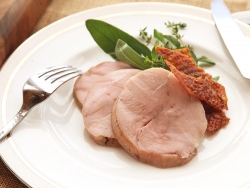
If you want to get extra fancy, you can plate up individual portions of turkey and skin for each guest.