Chicken Thigh
J. Kenji López-Alt is the Managing Culinary Director of Serious Eats, author of the James Beard Award-nominated column The Food Lab, and a columnist for Cooking Light. He lives in San Francisco. A New York native, Kenji cut his cooking chops the old-fashioned way by wo ...
Chicken thighs most often come either bone-in and skin-on, or boneless and skinless. I recommend using the former if cooking thighs alone. Some recipes have you remove the bone before cooking. I find this unnecessary. Unless you’re experienced with a boning knife, it’s far easier to remove the bone after the chicken has been cooked.
One step I do find convenient is to chill the chicken down in an ice bath after cooking. This allows you to give the chicken leg a longer time over moderate heat in a skillet just before serving in order to get extra crispy skin without overcooking the chicken underneath.
TEMPERATURE AND TIMING FOR CHICKEN THIGH
Texture: Firm, very juicy, slightly tough
Temperature: 150°F / 66°C
Timing Range: 1 to 4 hours
Texture: Tender and very juicy
Temperature: 165°F / 74°C
Timing Range: 1 to 4 hours
Texture: Fall-off-the-bone tender
Temperature: 165°F / 74°C
Timing Range: 4 to 8 hours
Shop Sous Vide Cookers
Precision® Cookers
Sous vide made easier than ever.
Ingredients for 1
Chicken thigh (bone-in and skin-on recommended)
Salt
Pepper
Aromatics (thyme, garlic, rosemary - optional)
---For Finishing Steps---
1 tbsp / 15 ml vegetable, canola, or rice bran oil
---For the Sauce---
Minced shallots or garlic
Glass of wine or shot of liquor
Pat of butter
Lemon juice
Directions
-
Step 1
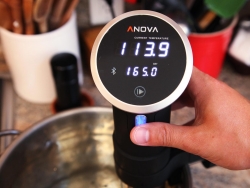
Pre-heat your Precision Cooker to the desired final temperature according to the chart included here and in the app. Allow the water bath to come to temperature before adding your chicken.
-
Step 2
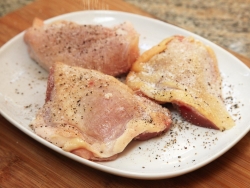
Season bone-in, skin-on chicken thighs, drumsticks, or legs generously with salt and pepper.
-
Step 3
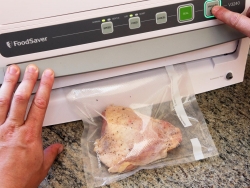
To bag chicken legs, start by folding the top of a vacuum-seal or zipper-lock bag back over itself to form a hem. This will prevent chicken juices from getting on the edges of the bag which would interfere with the seal or provide vectors for contamination. Add aromatics such as thyme, garlic, or rosemary as desired. Seal the bag either using a vacuum-sealer or, if using a zipper-lock bag, by using the displacement method. To do this, slowly lower your bagged steak into a pot of water, letting the pressure of the water press air out through the top of the bag. Once most of the air is out of the bag, carefully seal the bag just above the waterline.
-
Step 4
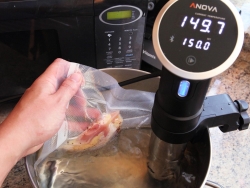
Drop the bag in the water bath, making sure not to block the intake or output sections of your Precision Cooker. If properly sealed, chicken should sink. Cook according to the timing charts for your preferred level of doneness.
-
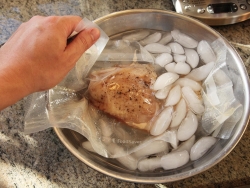
Step 5
Once the chicken has cooked for the desired time, transfer the bagged chicken to a prepared ice bath to chill completely. At this stage, chicken can be stored in the refrigerator for up to three days before finishing and serving.
-
Finishing Steps - Stovetop
-
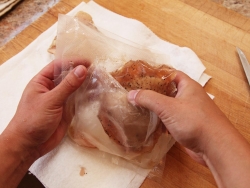
Step 0
Remove the chicken from the bag, discard any aromatics (if using) and place it on a paper towel-lined plate.
-

Step 1
Scrape off any gelled juices from the bag with your fingers and transfer it to a small bowl to use for a pan sauce later on.
-
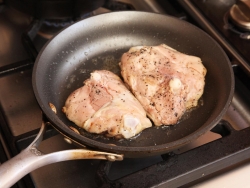
Step 2
Place a high-quality, non-stick or cast-iron skillet with one tablespoon / 15 ml of vegetable, canola, or rice bran oil over medium heat until shimmering and carefully add the chicken to the hot oil, skin side down. For best results, use a flexible slotted fish spatula or your fingers to press down on the chicken slightly to get good contact between the skin and the pan. I recommend wearing gloves and long sleeves if you are very sensitive to small oil splatters. Cook the chicken, occasionally lifting the corner with your spatula to peek underneath (if the chicken doesn’t immediately lift easily with the spatula, do not force it. Let it cook longer until it releases naturally). Continue cooking until the skin is very brown and completely crisp, 4 to 5 minutes total.
-
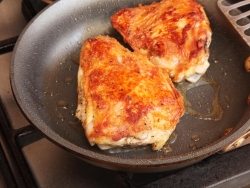
Step 3
Flip the chicken and cook the second side just until the chicken is warmed through, about 1 minute longer. Transfer the chicken to a paper towel-lined plate while you make a pan sauce (if desired).
-
Step 4
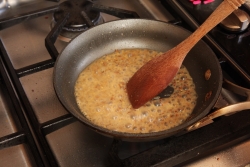
If you’d like to make a pan sauce, start by adding a few chopped aromatics to the pan such as minced shallots or garlic. Cook until fragrant, then add a glass of wine or a shot of liquor along with the gelled chicken juices you reserved from the sous vide bag. Add secondary flavorings like whole grain mustard if desired.
-
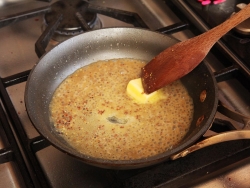
Step 5
Swirl in a pat of butter along with chopped herbs and a squeeze of lemon juice as desired. Season to taste with salt and pepper. If the sauce looks greasy or broken, add a few tablespoons / ml of water and stir vigorously to loosen it up and emulsify.
-
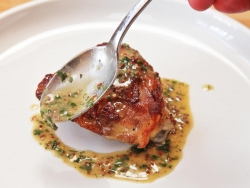
Step 6
Serve the chicken and sauce immediately.