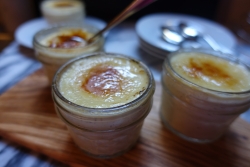
Sous Vide Ultimate Creme Brûlée with Flavor Variations


Smooth and silky, creamy and rich, with that perfect layer of crunchiness to tap-tap-tap through to enjoy! Creme brûlée is a favorite sous vide dessert for so many reasons, and now you have the ultimate basic recipe that you can alter with flavor variations while knowing it is going to come out perfect every time!
Author
Nicole Poirier
Chef Nicole is our Content Development Chef at Anova Culinary, devoted to help making your sous vide recipe dreams come true and writing informative blog posts to aid you along the way. She attended culinary school at Ecole Ritz-Escoffier at the Ritz Hotel in Paris, France and worked as a restaurant chef in Rhode Island before becoming an award-winning international yacht chef. Chef Nicole has worked alongside Anova Culinary since our Kickstarter in 2014 and officially joined the team in November, 2016. She has a specialty private event and catering business and and enjoys teaching cooking to clients throughout the Bay Area.
Prep Time: 00:15
Recipe Time: 00:45
Temperature :
195F / 90.6C
Ingredients
- 2 c / 470ml heavy whipping cream
- 4 large egg yolks
- 1/4 c granulated sugar or xylitol sugar substitute
- 1/2 teaspoon ground vanilla or 1 tsp pure vanilla extract
- (optional variations) 1 tsp rose water; 1 tsp orange blossom water; 1 Earl Grey tea bag; 1 Tablespoon citrus zest of your choosing; 1 Tablespoon fresh ginger; 2 Tablespoons instant espresso; 1/4 tsp flavor extract such as almond, peppermint, anise, orange, etc; sprig of fresh basil, thyme, rosemary, mint, tarragon; fresh or dried bay leaves; pinch saffron; teaspoon dried lavender; the potential list goes on!
Directions
- Set your Anova to 195ºF/90.5ºC
- In a medium-size mixing bowl, combine the egg yolks and sugar and whisk until pale and well-combined. Set aside.
- Pour the heavy cream into a small saucepan with deep sides and place over medium-high heat, bringing only to a simmer. Pro-tip - WATCH THAT PAN! Cooking cream loves to boil and crawl out of the pan. If the level starts to rise, turn the heat down or temporarily remove the pan itself from the burner. Otherwise, you will end up with a mess.
- Once the cream is heated, choose your flavoring! For basic creme brûlée, stick with the vanilla alone. Otherwise, choose any of the listed options - or even try others of your own - and allow to simmer lowly for 3 - 4 minutes.
- Remove pan from the heat, and after allowing to cool for a couple of minutes, pour a small amount (1/4 c or so) of the cream through a fine-mesh sieve or strainer into the yolks to temper them. Whisk to combine, and then continue the straining and whisking process with the rest of the cream.
- Divide the mixture evenly between 4 4-to-8 ounce mason jars with two-part screw-top lids.
- Attach the lids and screw shut to "fingertip tightness", the variable of "closed-ness" achieved by using only your fingertips to screw on the lids. They should feel a little loose - this will allow air bubbles to escape and prevent the jars from cracking.
- Place the jars into the bath.
- Cover the vessel with cling film/Saran Wrap and set the timer for 45 minutes.
Finishing Steps
- Remove the jars from the bath and dry off with a towel. Allow to cool for a few minutes on the countertop before putting in the refrigerator for a minimum of 4 hours. They will keep in the fridge for up to 5 days.
- When you are ready to consume, take out of the refrigerator and remove the lid. If the surface is not smooth, this can be remedied by grazing the surface with the back of a heated spoon (as in dipped in hot water).
- Sprinkle 1/2tsp - 1tsp sugar on the top of each custard.
- Caramelize with a blow torch or underneath a preheated broiler/salamander.
- Tap-tap-tap and enjoy!

